Tuesday 11 November 2014

Ello Invitation Code

So i joined Ello today . I know the initial buzz regarding this had died down . But still there are tons of people who are eager to check out the new social media experience . So , what is Ello ? This is what the makers says
Ello is a simple, beautiful, and ad-free social network created by a small group of artists and designers.
We originally built Ello as a private social network. Over time, so many people wanted to join Ello that we built a public version of Ello for everyone to use.

Ad-free

Ello doesn’t sell ads. Nor do we sell data about you to third parties.
Virtually every other social network is run by advertisers. Behind the scenes they employ armies of ad salesmen and data miners to record every move you make. Data about you is then auctioned off to advertisers and data brokers. You’re the product that’s being bought and sold.
Collecting and selling your personal data, reading your posts to your friends, and mapping your social connections for profit is both creepy and unethical. Under the guise of offering a “free” service, users pay a high price in intrusive advertising and lack of privacy.
We also think ads are tacky, that they insult our intelligence and that we’re better without them.
Anyways , for those who are searching frantically over internet for the invite code , i have some good news . I got some invite codes with me and i am willing to share for free . Please leave your email id in the comments , i will send you the codes . Oh don’t worry , i don’t spam .
Alternatively , you can give a try on the ello code generators ( google it ) , but most of them doesnot work .
Bye Bye . Happy to help :D

Monday 27 October 2014

7 Points to save the smart phone battery : My experience

I use a Samsung Galaxy S4 mini Duos for last 8 months or so . From the initial days itself i found that my battery does not lasts not more than half a day . I tried the various battery saver apps , switched the GPS off , mobile data off and minimal wifi usage . But still no success . I found out that my phone is losing about 4 % charge every hour , even in the sleep hours . That was perplexing . I searched the various forums and discussed my dilemma with the experts , but the tips they gave me was not evoking any response in my phone .  In fact the tips given by them were trivial and i had already applied with no success . Then i got the Kitkat update for my phone . After the updation , the issue seem settled . But after a few days my phone went back to dismal battery life . Even in flight mode, the phone was using more than 35 % battery in 5 hours !!

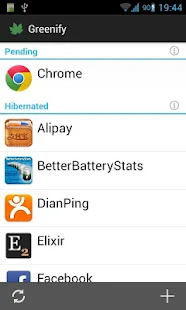
Then i decided to root the phone. I knew that rooting will make the warranty void. Hell with the warranty . After rooting also , the battery issue was prominent . Then i got the little app called Greenify . What it does is hibernating the apps running in the background . Along with an Xposed module and a donation version of Greenify , we can even hibernate the system apps. You can run Greenify even in non rooted phones , but functionalities are obviously limited , even with a donation version. Well actually if you are very patient , you don't even need this app. All you have to do is to got the task manager and manually stop / force stop each and every app running in the background .
Anyhow , Greenify yielded me a 10-20 % boost in battery life . But i was not satisfied .


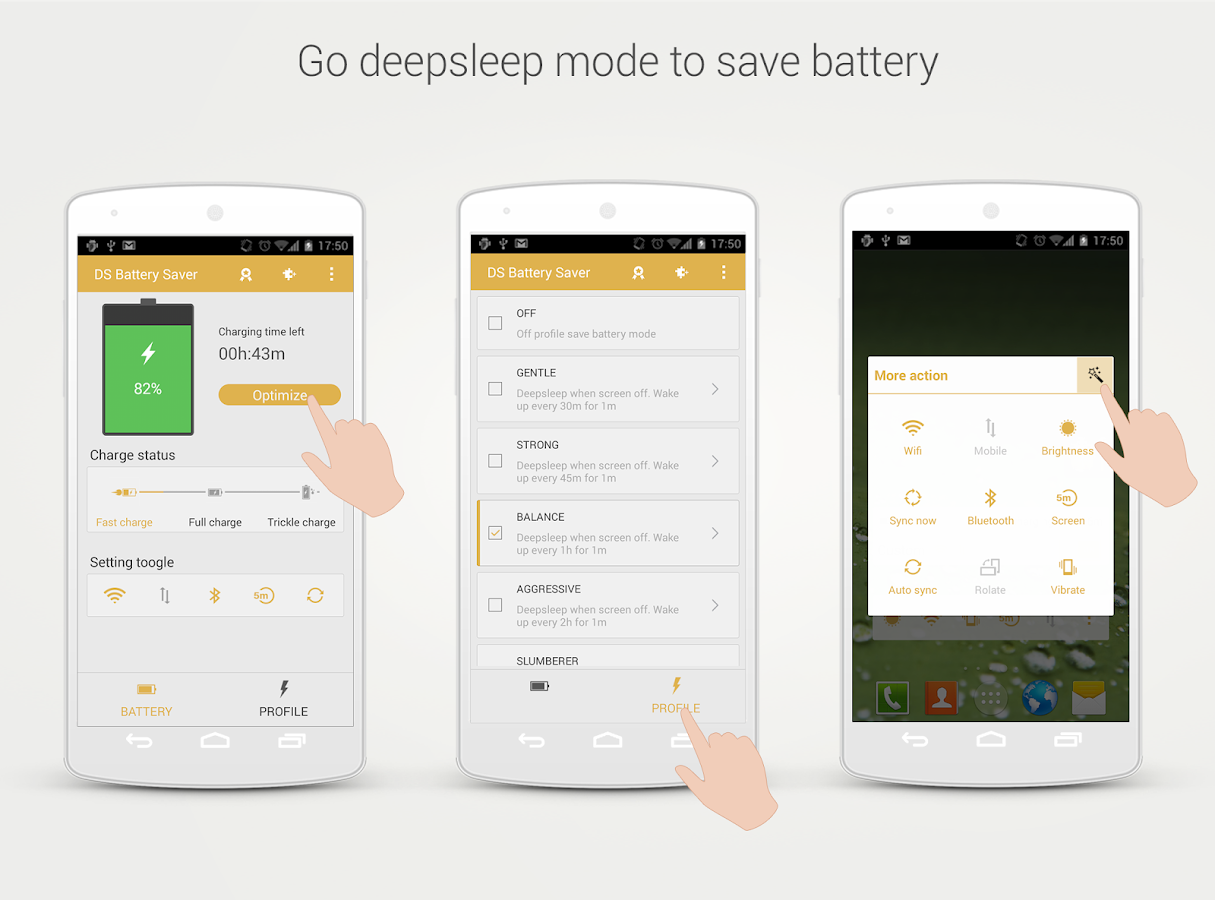
 Somebody recommended me an app called WakeLock Detector. As the name suggests , this app will monitor our phone silently and gives us an insight on which apps are waking up the phone . Just the list of apps . No hibernation / fressing is done by WLD . Since i already had this feature partially addressed by Greenify itself , i didn't find it useful . Then i discovered the apps - Deep Sleep Battery saver and the Battery Stats Plus . Deep Sleep Saver puts the device into deep sleep mode as and when the screen is off . You can choose the frequency and duration of sleep using the profiles .

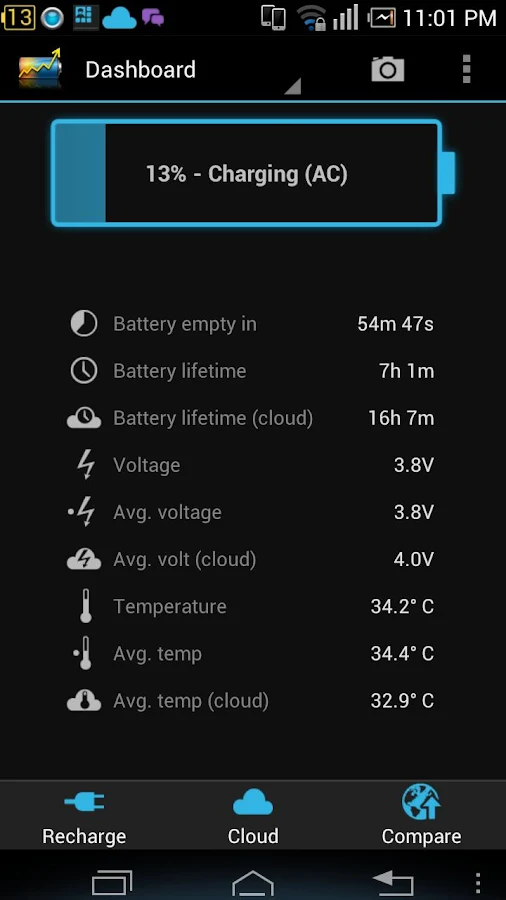
Battery Stats Plus analyses our phone continuously , detects and notify the battery draining apps . Moreover , you can compare your stats with that of other users through cloud service .


Together with these apps , my phone gained noticeable battery life . But there were some issues like my phone was draining more during the night than in the day time. I charged my phone completely in the morning at 9 . By evening 5 , after moderate internet and phone usage , the battery stands 71 % at 5 in the evening . At night 11 , it was 60%  . Next day morning 7 , the stats read 19 % . The battery stats says that installed apps used less than 11 % . Android system , Device Idle, Google Services and System Stand By used more than 70 % together and the rest by display and media server .
I realized that , even though Greenify hibernates system apps , some of the bloat wares that came preloaded are explicitly waking the phone up and that was causing the draining . In the mornings , i sued to click the auto hibernate button every now and then . Whereas in the night the phone is completely depending upon the greenify to auto hibernate those apps , which never happened effectively . This explains the night draining issue .

Then came the ROM Toolbox Lite / Pro  . This app is  a swiss army knife. Multiple apps bundled into an interface .  I used the Appmanager to find which apps are running . I found a dozen bloatwares(samsung services and apps)  and some apps and froze them . It is essentially the same what you can achieve by disabling the apps in the default Android task manager . But this app just simplifies the process . Anothe feature i found helpful is the ability to modify the permissions of the apps . If you feel suspicious about an app/ game asking for your phone contact details / device status etc , you can disable that particular permission without affecting the normal functionality of the app .

So with all these done , my phone is somewhat normal , i guess . It can run a day and a half in single charge with moderate WiFi and game usage . 

So to wrap up the post , here are my tips to save the battery .( includes the cliches) 

1 . Keep the display brightness in minimum
Even with auto brightness set , you can reduce it further by moving the slider to minimum position (-5 in Samsung ). Set the display off  time limit to minimum.
2 . Turn Location / GPS off  when not in use . 
By default , the location mode is set to High accuracy , where in the app uses the WiFi , GPS and Mobile network to triangulate your position . This is a huge battery drainer . So either you can turn the location off or  change the accuracy to low . Also keep WiFi and mobile data off , when not in use. 
3. If Power Saver Mode is available , turn it on . 
Not a real saver , in my case . But who knows , give it a try 
4. There is no point in downloading the battery saver apps , unless your device is rooted , because those apps in turn will eat up a portion of your battery life . 
5. Root your device 
Gain control over the bloatwares . 
6. Use these 3 Apps  - Greenify (Donate) , Deep Sleep Battery Saver and ROM Toolbox Pro .
Greenify the apps and enable hibernating system apps . You can safely hibernate almost all apps , but do not hibernate the alarm and clock apps. Use the AppManager and find the running apps and services. Do a google search for any of the service and find whether disabling it will cause any issues . 
7. And finally , you can save further by disabling Google Play Services and Play Store
But this will affect some apps that need Play services . Also you couldnot download from Play Store. So not recommended to disable . But you can safely force stop Google Play Services and Playstore , when not in use . Definitely saves a lot . 

Thursday 31 July 2014

Time Lapse Movie using Nikon Coolpix P510 camera


Nikon P510 ! An amazing camera to own . We all know about the amazing 42 X zoom of this camera and not to mention about the near DSLR adjustments possible. But many of us may be unaware of the capability of this camera to make time lapse shots . You can use these shots in a video editor to create an amazing time lapse movie .

Have a look at this video from YouTube to have an idea of what is possible , even though the camera used is a different one .


You can create a movie similar to that one by following these simple steps . To make time lapse shots , an external device called intervalometer is used . Fortunately , for us the Nikon Coolpix P510 comes with an inbuilt setting which could be used as an alternative.

How to do it ?

Before you start taking pictures , make sure that your camera is fully charged . 
Enough space is there in the SD card.
Also , if you don't have a tripod , make sure to keep the camera in a steady position .
Change the camera mode into Manual focus mode and lock the focus on your point of interest.
Press the Fn key on the camera and choose the timer setting.
Use a 5 minutes or 10 minutes for the timer , it is your choice.
Press the Shutter button once .
Remember that the camera will keep on capturing pictures in regular intervals , till you stop the camera . So make sure that the time setting you choose is ideal for your purpose . 
The camera will go into the standby mode in between the shoots , but remember every initial setting including zoom. Don't press the shutter button till you are done with the shoot. Press the power button to stop shooting .
Once you have all the shots , drop the pics into a video editor like the free Windows Movie Maker. 
Use an interval of 10 frames per second or so .Now you should have made your time lapse movie .

Please watch the below video to know how to do it . I used the Nikon Coolpix P510 camera , but this trick applies to all Coolpix cameras .


So what you think of the trick. Know something better. Please drop in your suggestions and comments below . Happy to help :)

Saturday 26 July 2014

Android Kitkat update for Samsung Galaxy S4mini Duos

Samsung Mobile have officially released the Kitkat update for their Galaxy S4 mini duos( GT-I9192) in Russia. Other regions are awaiting the release. But you don't have to wait,  as  the update is now available for download from Sam mobile website . Those from other regions can also install this update. I am from India and I have been using this update here without any issues.

Tuesday 22 July 2014

Download videos from YouTube without any software or plugin


This week I am going to tell you how to download videos from YouTube without any software or browser plugins. There are many websites like keepvid.com that offers users to download YouTube videos in multiple format. But most of them requires Java to be installed in your computer . Also there are possible sources of security vulnerabilities in the java . Also these websites (some of them) doesnot work in the mobile browsers. 

So what is an alternative. Officially Google does not allow you to download from YouTube and doing it is against the user policy of them. So we are left with the third party websites. 

So let us see how to download from YouTube . 

Go to Youtube home page and open the video you want to download  .


I wanted to download the official FIFA World Cup 2014 Song . To download it , i need to add 'ss' to the address , just before youtube 


You will be redirected to the page of website en.savefrom.net 


Just click in which format you want the video. Done ! The video will start downloading immediately . Give it a try 

Got a better idea ? Please share with me . 

Happy to help :) 

Friday 11 July 2014

Enable Right click in websites that block it

You probably might have came across some websites that blocks the right click menu . Every time you right click , a script message will be displayed . This could be particularly annoying , when you are trying to copy some picture or text from the page . Website makers have incorporated this feature for safety of the customer and in some cases to protect the content .


But there is a way by which you could surpass this restriction. All you have to do is to disable the scripts in the page . For that , in chrome , press CTRL, SHIFT and J together to reach the console window . Now click the gear icon on the right side of the console to open the settings page .


In the settings page , you have the option to enable or disable scripts. 


Click the check box to disable scripts . Now close the console window and reload the page . The right click restriction is now bypassed .


Now , this trick has got a disadvantage also. What you have now done is disabling all the scripts from running . Not just this page , but for the whole browser. So some of the web functionalities will not work. To make them work , just enable the scripts in the settings page. Done 

Watch the video below to see how to do it . 


Like this trick ? Please share your opinions in the comments. Happy to help :)

Thursday 10 July 2014

How to record your android screen as video


Capturing the screenshot is now part of the standard equipment in most of the android phones . In Samsung phones , all you have to do is to press the Power key and the Center key together to capture your screen shot as image . But what if you want to record a game you are playing on android ?   Of course you can mirror your Android screen to compatible TV using Screen Mirroring . Also there are applications like Droid@screen and Mirrorop that does this task effectively . But what i am talking about is not mirroring , but capturing . Imagine you want to make a tutorial on how to play a particular android game. The best way to do it is by making a video oh how you play . So how will you do it. Unfortunately Android doesn't allow this feature by default. May be because of hardware restrictions . But some apps are there in Google Play which serves the purpose. Some of them requires the latest version of Android ( 4.4  KitKat) and some requires a rooted phone and some other requires a laptop connected . The one app that catches my attention is SCR screen recording app. Why i opted this app is because of three reasons 
1 . The app is free for download and is available for all android versions starting from 2.3 Ginger Bread 
2 . The app size is very small (3.37 MB)
3 . My phone is rooted 

For non rooted phone users , apps like Free Screen recorder is available . To know how to root the phone , please read this.

Now how to record the screen using SCR .

Download the app from Play Store . They have a free app and a free version.
Open the app , you will get a tiny menu will appear as show below


Click on the Gear button to adjust the settings. You change options like frame rate , bit rate , resolution , Render engine etc. You also have the option to change the audio source. You can either use your mic or just mute the audio.
Now that you have made your settings , start capturing by pressing the capture button( orange in color) . SCR starts recording immediately and without any hogs . When you are done with recording , just click the lock screen or click the SCR app icon in the phone menu . Your recordings will be stored in the pre determined folder and can be accessed via the gallery . 


The video is recorded in the mp 4 format . To know the quality , watch the video below which was captured from my phone 


When i stopped recording by pressing the lock screen key , the captured video ends with a black screen for 2 seconds which had to be edited out 
The free version of the app doesn't allow you to capture the screen continuously for three minutes only and also adds a watermark . Of course you can bypass these restrictions by buying a pro version 

So what you think ? Was that  useful for you ? 
Please share your comments and help me grow . Happy to help :)